Stop Instagram From Ruining Your Photo Quality
Stop Instagram From Ruining Your Photo Quality
Instagram ruining your photo quality after upload? Here are the real causes and the exact export settings and app toggles that keep photos sharp.
- 1Why Does Instagram Ruin Your Photo Quality
- 2The Export Settings That Beat Instagram Compression
- 3How to Fix Washed Out Colors on iPhone
- 4Instagram Image Sizes That Survive the 2026 Grid
- 5Instagram Settings to Turn On Before You Post
- 6Frequently Asked Questions
- Why does Instagram lower my photo quality after I post?
- What export quality should I use for Instagram?
- Why do my iPhone photos look washed out on Instagram?
- What is the best photo size for Instagram in 2026?
- How do I stop HEIC photos from looking blurry on Instagram?
- Does turning on high quality uploads really help?
- 7Quick Takeaways
TL;DR: Instagram degrades your photos for two main reasons: it resizes anything wider than 1080 pixels and recompresses files over about 1MB, and it clips the wide P3 colors from newer phones down to sRGB. The counterintuitive fix is to export at 80 to 85 percent JPEG quality, not 100, at 1080 pixels wide in the sRGB profile, then turn on high-quality uploads in the app. Do that and most of the “ruined” look disappears.
If your photos look crisp in your camera roll and muddy the second they hit Instagram, you are not imagining it. The platform runs every upload through an aggressive compression pipeline built for speed and data savings, and it does real damage to anything you did not prepare for it.
The frustrating part is that the most common advice makes it worse. Exporting at maximum 100 percent quality feels right, but a larger file trips Instagram’s heavy-compression threshold and gets crushed harder than a leaner file would. The platform punishes oversized uploads more than it rewards them.
Here is what really controls how your photo survives: pixel width, file size, and color profile. Get those three right before you upload and the difference is night and day. If your posts are also getting buried, our guide on Instagram reach dropping covers the visibility side of the problem.
Why Does Instagram Ruin Your Photo Quality
Instagram ruins photo quality because it downscales anything wider than 1080 pixels, recompresses files over roughly 1MB, and converts wide P3 phone colors down to sRGB, which clips your most saturated tones.
Each of those is a separate problem with a separate fix.

What is a color profile: A color profile defines the range of colors an image can show. Display P3 is a wide range used by newer phones; sRGB is the narrower web standard Instagram forces every upload into.
The resizing is the one most people know about. Instagram’s maximum supported width is 1080 pixels, so if you upload a 4000-pixel photo, the app downscales it on the spot, and that local resize is lossy. Upload something under 320 pixels wide and it upscales instead, which looks even worse.
File size is the trap nobody warns you about. Once a photo exceeds about 1MB, Instagram applies heavier compression, so the giant 100 percent quality export you thought was safest is the one that gets mangled. The way I see it, this is the single most common self-inflicted wound in the whole process.
The magnitude is easy to underestimate. Instagram’s pipeline can shrink a 1.6MB photo down to around 125KB, a roughly 13 times reduction, and it re-encodes every upload to about a 70 to 75 percent quality equivalent. Hand it a leaner file that already sits near its target and there is far less for that compressor to strip out.
Then there is color. Newer iPhones capture in Display P3, a gamut about 25 percent wider than the web standard, and Instagram flattens everything to sRGB. That conversion clips your brightest reds and greens, which is why a punchy photo can land looking dull or washed out even when nothing else went wrong.
The Export Settings That Beat Instagram Compression
The settings that survive Instagram are a 1080 pixel wide JPEG at 80 to 85 percent quality, converted to sRGB, sitting around 1.5MB.
Exporting smarter beats exporting bigger every time.
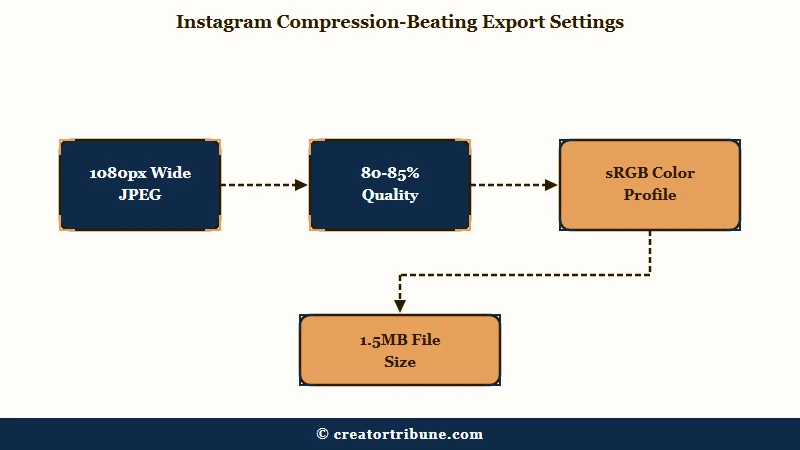
In my experience, dialing in an export preset once and reusing it solves 90 percent of quality complaints. Here are the values I would lock in.
| Setting | Recommended value | Why it matters |
|---|---|---|
| Format | JPEG | Instagram converts everything to JPEG anyway; do it yourself cleanly |
| Width | 1080 px (1080×1350 for feed) | Matches Instagram’s cap so it does not resize |
| Quality | 80 to 85 percent | 100 percent inflates file size and triggers harder compression |
| Color space | sRGB | Prevents the P3 clip that washes out colors |
| File size | About 1.5MB, under 2MB | Stays under the heavy-compression threshold |
| Sharpening | Screen, Low | Survives downscaling without looking crunchy |
That quality row is the one to sit with. Setting export quality to 100 percent feels like the safe choice, but it pushes file size up, and once you cross roughly 1MB, Instagram compresses far more aggressively than it would have on an 85 percent file. A lower-quality export leaves you with a higher-quality result on the feed.
Before: Export a 4000 pixel wide HEIC at 100 percent quality in Display P3 and let Instagram handle the rest.
After: Export a 1080×1350 JPEG at 82 percent quality, converted to sRGB, landing near 1.5MB. The second file looks sharper and more saturated on the feed despite being smaller.
How to Fix Washed Out Colors on iPhone
To fix washed-out colors, convert your photo to the sRGB profile before exporting and switch your iPhone camera to Most Compatible so it captures JPEG instead of HEIC.
These two changes kill the dull, muddy look most people blame on Instagram alone.
What I would do first is stop the HEIC conversion at the source. Newer iPhones save photos as HEIC to save space, and Instagram’s in-app conversion to JPEG often introduces muddy textures and softness. Handling the conversion yourself with proper settings avoids that.
Here is the sequence I would run to clean up iPhone color and clarity.
- Open iPhone Settings, go to Camera, then Formats, and select Most Compatible so the camera captures JPEG.
- Edit and export in an app like Lightroom or VSCO, and set the color profile to sRGB before exporting.
- Keep export quality at 80 to 85 percent rather than maximum, so the file stays under the compression threshold.
- Post the exported JPEG rather than the original HEIC straight from the camera roll.
For images you send privately, the same logic applies but the compression is worse. Direct messages get crushed to around 200 to 300 KB at 720p, so use the Send in HD toggle in the DM picker when image quality matters.
If you cross-post the same asset to other platforms, our guide on posting without watermarks keeps the file clean across apps.
Instagram Image Sizes That Survive the 2026 Grid
For 2026, export at 1080×1440 to match the new 3:4 profile grid, or 1080×1350 for the 4:5 feed standard, and keep faces and text out of the outer 10 percent. The grid changed, and old square crops now look wrong.
The way I read the 2026 layout, the profile grid moved from square thumbnails to a 3:4 vertical ratio, which changes how your older posts crop on your profile. Designing for the new ratio keeps your grid clean.
| Placement | Pixel size | Ratio |
|---|---|---|
| Profile grid optimized | 1080 x 1440 | 3:4 |
| Feed portrait standard | 1080 x 1350 | 4:5 |
| Stories and Reels | 1080 x 1920 | 9:16 |
One habit saves a lot of reposting. Keep important elements, faces, logos, and text, inside the center of the frame and away from the outer 10 percent, since that edge is where crops and compression artifacts show up first. If your Stories specifically are failing to post or looking soft, our fix for Instagram Stories not uploading walks through that case.
Instagram Settings to Turn On Before You Post
Turn on Upload at Highest Quality in Data Usage settings and make sure Data Saver is off, because both silently cap your upload resolution.
These toggles override good export work if you leave them wrong.
From my testing, plenty of creators do everything right in Lightroom and still lose quality because the app is throttling uploads. Two settings control this, and they take 30 seconds to fix.
- Open Instagram, go to Settings and Account, then Data Usage, and toggle on Upload at Highest Quality.
- In the same area, make sure Data Saver is turned off, since it reduces upload quality to save bandwidth.
- For Reels, export at a higher bitrate, around 8 to 12 Mbps, since Instagram allows a 3 to 6 Mbps ceiling and a sharper source survives better.
A quick reality check on scale explains why Instagram leans on compression so hard. According to Statista’s Instagram figures, the platform serves well over a billion users, so trimming every file for bandwidth adds up fast for them. That is also why posts that lean on motion get squeezed; if your Reels keep underperforming, our guide on low Reels reach covers that angle.
Frequently Asked Questions
Why does Instagram lower my photo quality after I post?
Instagram downscales any photo wider than 1080 pixels and recompresses files larger than about 1MB. It also converts wide P3 phone colors to sRGB, which clips your most saturated tones, so colors can look duller after upload.
What export quality should I use for Instagram?
Export JPEGs at 80 to 85 percent quality, not 100. A 100 percent export creates a larger file that crosses Instagram’s compression threshold and gets crushed harder, so a leaner 85 percent file ends up looking sharper on the feed.
Why do my iPhone photos look washed out on Instagram?
Newer iPhones capture in Display P3, and Instagram converts everything to the narrower sRGB profile, clipping your brightest colors. Convert to sRGB in your editing app before exporting to fix the washed-out look.
What is the best photo size for Instagram in 2026?
Use 1080×1440 (3:4) to match the 2026 profile grid, or 1080×1350 (4:5) for maximum feed visibility. Stories and Reels use 1080×1920 (9:16). Keep important elements out of the outer 10 percent of the frame.
How do I stop HEIC photos from looking blurry on Instagram?
Switch your iPhone camera to Most Compatible under Settings, Camera, Formats so it saves JPEG instead of HEIC. Instagram’s in-app HEIC to JPEG conversion adds muddy textures, so handling it yourself keeps photos sharp.
Does turning on high quality uploads really help?
Yes. Instagram has an Upload at Highest Quality toggle under Data Usage that is not always on by default, and Data Saver can cap resolution. Enabling one and disabling the other preserves more of your exported quality.
Quick Takeaways
- Instagram damages photos by resizing anything over 1080 pixels wide, compressing files over about 1MB, and clipping P3 colors down to sRGB.
- Export 1080 pixel wide JPEGs at 80 to 85 percent quality in sRGB, around 1.5MB. A 100 percent export backfires by triggering harder compression.
- Fix washed-out iPhone colors by converting to sRGB before export and switching the camera to Most Compatible JPEG.
- Turn on Upload at Highest Quality and turn off Data Saver in Instagram, then design for the 2026 3:4 grid at 1080×1440.